Finding of Spiky-Looking Orange and Black Bug (Get Rid)

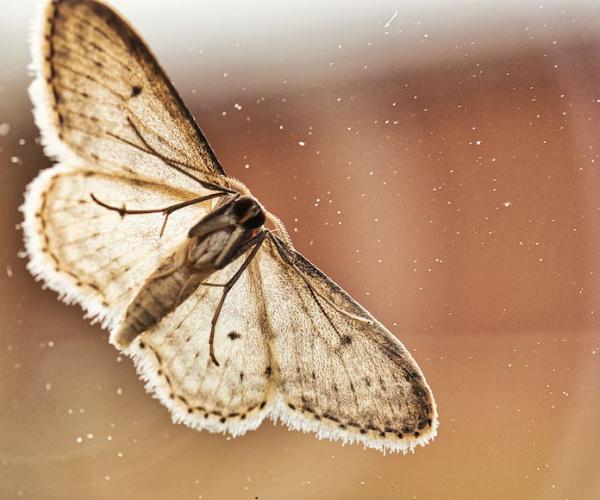
The larvae of Multi-Colored Asian Lady Beetles look spiky orange and black.
Definition

Larvae: The immature free-living form of most invertebrates.
Spiky Looking Orange and Black Bug
Look like
- The Asian lady beetle larva resembles a small spiny alligator with an orange-black body. It has two small rows and the back side has orange-to-reddish spots.
- The bug is very black with an orange square on its back.
- It has small spikes and looks like a mini scorpion without the tail, and has no wings.
- Lady beetle larvae are dark and alligator-like. They have six legs. They are spiny and black with bright spots.
Shape
The larvae are small, alligator-shaped, spiny black, orange, and yellow insects that feed voraciously on aphids and other insects too slow to get out of the way.
Size
Newly hatched It is approximately 0.125 (1/8) inches or 3.175 millimeters long and grows to about 0.5 (1/2) inches or 1.27 centimeters.
Found
Some people have reported – it is approximately 1 centimeter or 10 millimeters in length, found on vegetation in an open area within a woodland.
Grow Up
The Asian Lady Beetle larva undergoes molting before transitioning into a pupa. This pupa, typically found near an aphid colony, attaches itself to a leaf or another surface. Resembling the adult beetle in size and shape, the pupa features an orange color with distinctive black spots.
Lady Beetles

The Multi-Colored Asian Lady Beetle is also known as Harmonia axyridis. It is a common insect in the landscape and also in urban areas. It is a native and mostly found in Asia and relatively new to Michigan.
It’s often confused with plant pests. Like other many exotic species, it has adapted to climates and habitats in the US.
It is a highly beneficial predator of a variety of insect pests, especially aphids, in food crops, trees, and landscape plantings.
When Lady Beetles Introduced
This species was introduced by USDA scientists in the late 1970s and early 1980s to control insects.
This Asian species was introduced into California in 1916 and into the rest of the United States and parts of Canada from 1978 to 1982. They are also found in Georgia, Louisiana, Mississippi, Maryland, Connecticut, and Delaware.

Where Lady Beetles Lives
Ladybug’s beetle is originally from Asia such mostly found in Japan, China, and Siberia. The Ladybug is found throughout the US. They can be found in open habitats including gardens, and fields, and even at home.
Did you know?
- Only one lady beetle may eat as many as 5,000 aphids in its lifetime
- It has 0 to 20+  black spots
- More than 450 species of lady beetles are found in North America
- Each larva eats 200 to 300 aphids
- Ladybeetles may eat 1000+ aphids in its lifetime
Lady Beetles Also Known As
Lady Beetles are also called by different names:
- Harmonia Axyridis
- Lady Beetles (Ladybeetles)
- Multi-Colored Asian Lady Beetles
- Asian Lady Beetles
- Ladybugs
- Ladybird
- Ladybird Beetles
- Coccinellidae
- Harmonia Bug
Definition

Coccinellidae: Coccinellidae is a widespread family of small beetles.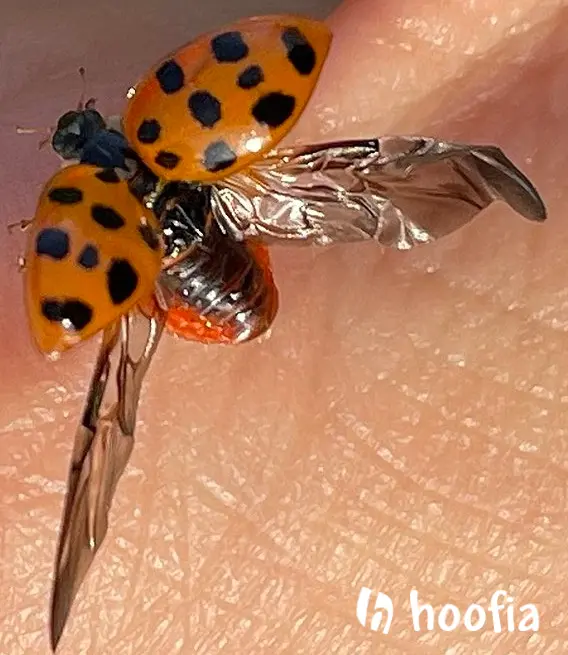
Multicolored
The term “multicolored” describes the varying colors exhibited by this species, which include shades of black, red, and orange.
Number of Colore Spots
- Red: Two red spots
- Black: Zero to 19 or 20 or more black spots
- Typically, these insects possess 10 black spots on their forewings, although variations exist with fewer spots, faded spots, or even an absence of spots.
Forewing and Body Color
- Ranges from yellow – to orange – to red
- Some have yellowish or orange forewings
- Some wings have entirely black with red spots
- There are some bright reddish-orange ladybeetles
- Lady beetles are usually red or orange with black markings
- Some ladybeetles are black, often with red markings
- Coccinellids display vibrant colors as a defense mechanism against potential predators. This strategy is effective because many predators associate the bright combination of orange and black with toxicity and an unpleasant taste.
- The most common pattern is the black “M” on a white plate just above the wings
- The color of its back elytra generally ranges from mustard yellow to bright red-orange. Black forms are found in some parts of the world
Definition

Elytra: Either of the front wings in beetles that cover and protect the hind wings.
Distinguishing Characteristics
Definition

Pronotum: The segment located on the insect's back, directly behind the head, is referred to as the pronotum.
On Asian Lady Beetles, it is straw colored with 4 black spots that form a W-shape when viewed from the front or an M-shape when viewed from behind.
Is This Beetle A Pest?
Definition

Reflex Bleeding: Adults are aposematically colored and when attacked, will secrete alkaloid-laden blood from their leg joints. This behavior is known as reflex bleeding.

Aposematically Colored: meaning their color serves as a warning.
The blood is bitter to the taste and can make your hands reek from handling
However,
If you live in a house, you probably appreciate the nuisance factor of these little beetles during October when they defy all our efforts to keep them out and off our walls.
Beneficial Insects
Lady beetles are the best-known beneficial insects. More than 450 species are found in North America. Some are native to the US and some are found in other countries.
Moreover, it’s a good thing to see them around because the adults and larvae are predatory, and eat insects like aphids.
What Does Ladybeetle Eat?
- They eat other insects. Every Lady Beetle requires to eat many aphids. So that they can lay eggs
- To grow the Lady beetle larvae may eat their weight in aphids every day
- Ladybeetles may eat 1000+ aphids in their lifetime
- Each larva eats 200 to 300 aphids as it grows
- If they don’t find prey, they eat each other or other beetle species
- The total number of aphids consumed through the larval stages varied from 90 to 370 aphids, and across all larval stages averaged 23.3 aphids consumed per day
- An adult Lady Beetle consumption typically ranges from 15 to 65 aphids each day
How Big Ladybeetles Are?
- Size is approximately 0.25 (1/4) inches or 6.35 millimeters long. Adult Lady Beetles size is about 0.39 inches or 1 centimeter long
- The adult is oval-shaped and about 0.25(¼) inches or 6.35 millimeters long and about 0.1875 (3/16) inches or 4.7625 millimeters wide
Habitat
Feed: During the spring and summer, Lady Beetles feed on aphids or scale insects which are pests in gardens, meadows, fields, orchards, and trees.
In the fall season, they sometimes gather on the sunny sides of houses and in garages or on porches. As the afternoons when cool off, some of these beetles make their way indoors. If squashed the beetles may stain fabric and painted surfaces.
Confuse with Lady Beetles vs Ladybugs vs Ladybird
Lady Beetle is more scientifically accurate. That’s because, in reality, Ladybugs aren’t bugs at all, they are Beetles.
Actually, all ladybugs are actually lady beetles, because ladybugs aren’t bugs at all.
Life Cycle

Life History
Life: Typically, adults live 30 to 90 days, but they can live up to three years.
Eggs: Females lay over 1600 eggs in the whole. Eggs are laid in small masses and kind of look similar to pale footballs.
Pupating: After hatch, the larvae go through four instars before pupating.
Larvae: Larvae are usually black or grey and have orange-red markings on the abdomen. Plus they usually have cool-looking spikes on their backs.
Impact on Human Body
Some people have reported receiving a mild nip/bite from beetles that have landed on them. There have been concerns that large numbers of beetles may possibly cause air quality problems indoors that could occur allergies or asthmatic reactions or both.
Suggestions and Recommendations for Residential
People show low tolerance to lady beetles inside the house. Humans like them in the garden but hate them inside.
Trouble occurs when populations increase, and large numbers of beetles enter buildings in the fall to hibernate. During unusually warm winter days and in early spring, the beetles wake up and crawl into areas of buildings inhabited by people.
We Don’t Recommend
Spraying Harmonia lady beetles.
Our Recommendations
- It is better to gently sweep them up and return them outdoors.
- If huge numbers of Ledybugs continue to invade a house, the possibility it means that the weatherstripping around the doors and windows needs repair.
- One encouraging aspect of multicolored Asian lady beetle biology is that they are victims of various predators and parasites so that a population may be locally abundant, but after a year or two, the number of Harmonia lady beetles drops off dramatically. Because it eats each other when they don’t get any other food.2
FAQ
What are the small yellow and black spiky bugs?
It is a Lady Beetle.
What are the small yellow and black spiky bugs?
It is a Lady Beetle.
References
We value your thoughts and experiences! Share your encounters with these fascinating creatures and any tips you have for dealing with them in the comments section below.
Don’t forget to spread the knowledge by sharing this post with your friends and followers on social media. Together, we can unravel the secrets of these unique bugs and help others create pest-free environments. Join the conversation and let’s make a difference!
Discover Ortho Bug B Gon for Pet-Friendly Solutions (for Pet ❤️’s)

Ortho Bug B Gon insect killer is safe for pets (animals, birds), people, and plants.
Statistic: According to the American Society for the Prevention of Cruelty to Animals (ASPCA), an estimated 2,000 pets die each year from exposure to insect killers.
Prioritize the safety of pets
- Keep bug free
- Safety for pets
Both are difficult at the same time.
Opting for pet-safe bug control solutions like Ortho Bug B Gon provides a reliable way to achieve both objectives.
In this article, we’ll explore how Ortho Bug B Gon offers effective pest control while ensuring the safety of your furry friends and minimizing exposure to harsh chemicals.
Even if you’re a new or experienced pet owner, this guide offers the essential information. It will help you create an eco-friendly and bug-free environment for your loved ones.
Let’s dive in!
Understanding Ortho Bug B Gon
Ortho Bug B Gon is a powerful insect control product designed to control diverse pests. That may invade your living spaces.
What makes Ortho Bug B Gon a standout choice for pet owners concerned about their animals’ safety is its exceptional pet-friendly formulation. You can trust this product to prioritize the well-being of your beloved pets.
With Ortho Bug B Gon, you can have peace of mind knowing that your pets can roam freely without exposure to harmful chemicals.
Identifying Common Household Bugs
Before we dig into the Ortho Bug B Gon, let’s first identify some common household bugs you might encounter.
- An
- Spider
- Roach
- Centipede
- Pillbug
- Earwig
- Weevil
- Silverfish
- Bed bug
Pests can pose potential risks to both humans and pets.
For everyone in your household, It’s crucial to address these infestations promptly to maintain a healthy and safe environment.
Identifying Household Pets
Identifying common household pests is an important part of effectively managing infestations and ensuring a comfortable living environment. From ants and spiders to roaches and other unwelcome guests, recognizing these pests enables you to take appropriate measures for their control.
Common Pets
- Puppy
- Rabbit
- Cat
- Dog
- Mouse
- Hamster
- Kitten
- Turtle
- Parrot
Some Other Pets
- Green Iguanas
- Red-Eared Sliders
- Argentine Black and White Tegu
- Bulldog
- Shepherd
- Beagle
- Poodle
- Yorkshire Terrier
- Chinese Water Dragon
- Green Anole
- Rat
- Chinchilla
- Ferret
- Maine Coon
- Persian
- Shorthair
- Ragdoll
- Siamese
- Sphynx
- Boxer
- Dachshund
- Chihuahua
- Husky
- Corgis
- Rottweiler
- Tree Frog
- Tiger Salamander
- Axolotl
- Pacman Frog
- Oriental Fire-Bellied Toad
- Amazon Milk Frog
- Cockatiel
- Finch
- Cockatoo
- Dart Frog
- Bearded Dragon
- Leopard Gecko
- Tortoise
- Crested Geckos
- Blue-Tongued Skink
- Monitor Lizards
- Canary
- Lovebird
- Parakeet
- Gerbil
- Hamster
- Cocker Spaniel
- Scottish Fold
- Russian Blue
- Devon Rex
- Labrador Retriever
- Golden Retriever
The Importance of Using Pet-Safe Bug Control
As a responsible pet owner,
You understand the importance of keeping your furry companions safe from harmful materials.
Traditional bug control methods often involve chemicals that can be toxic to pets if eaten or inhaled.
Opting for pet-safe bug control solutions like Ortho Bug B Gon not only ensures your pets’ but also safeguards your family from unnecessary exposure to harsh chemicals.
Ortho Bug B Gon’s Pet-Friendly Formulation
Ortho Bug B Gon stands out for its unique combination of ingredients that effectively affect bugs while remaining safe for pets. Its ingredients target bugs while minimizing potential risks to animals.
Rest assured that Ortho Bug B Gon has gone through extensive testing to make sure its efficacy without compromising pet safety.
Instructions for Using Ortho Bug B Gon
Using Ortho Bug B Gon is a straightforward process that any beginner can follow. Here’s a step-by-step guide to help you get started:
Preparation
- Ensure your pets are safely away from the treatment area.
- Wear protective gloves and clothing to avoid direct contact with the product.
Application
- Shake the Ortho Bug B Gon bottle well before use.
- Spray on targeted areas where bugs are present.
- Pay close attention to cracks, crevices, and entry points.
Safety Measures
- Keep your pets away from the treated area until it has dried completely.
- Ortho Bug B Gon keeps out of reach of children and pets.
- Follow the instructions on the label for proper disposal.
Additional Tips for Bug Control
To complement the effectiveness of Ortho Bug B Gon, consider implementing these tips to maintain a bug-free environment:
Regular Cleaning
- Keep your home clean and tidy, minimizing potential hiding spots for bugs.
- Vacuum regularly to eliminate crumbs and debris that may attract bugs.
Proper Food Storage
- Store food in airtight containers to prevent attracting ants and other pests.
- Clean up spills promptly to avoid inviting bugs into your home.
FAQ
Is Ortho bug killer safe for pets?
Yes, Ortho Bug B Gon is safe for pets when used according to the instructions provided.
Are Ortho bug clear granules safe for pets?
Yes, Ortho Bug B Gon Clear Granules are safe for pets when applied and used as directed on the product label.
Is Ortho Home Defense bed bug spray safe for pets?
According to the manufacturer’s instructions, Ortho Home Defense is safe for use around pets, so long as it is dry.
However, the active ingredient of Bifenthrin can be toxic to dogs. It is recommended to keep your pets away in another room until the spray dries out, which takes about 6-8 hours.
What is the active ingredient in Ortho Bug B Gon?
The active ingredient in Ortho Bug B Gon varies depending on the specific product formulation.
Ortho Bug B Gon products may contain active ingredients such as –
– Bifenthrin
– Permethrin
– Deltamethrin
It’s important to refer to the product label or packaging for the specific active ingredient information of the particular Ortho Bug B Gon product you are using.
What happens if my dog licks Ortho bug spray?
If your dog licks Ortho bug spray, it is important to take immediate action.
The specific reaction can vary depending on the formulation and active ingredients of the bug spray, as well as the quantity ingested and the size of the dog.
In general, common symptoms of ingestion may include –
– Drooling
– Vomiting
– Diarrhea
– Excessive thirst
– Loss of appetite
– Changes in behavior
It is crucial to contact your veterinarian or a pet poison control hotline immediately for guidance in case of accidental ingestion. They can provide appropriate advice based on the specific product and situation to ensure the well-being of your dog.
Finishing Line
Safe and Effective Solution
Ortho Bug B Gon offers a safe and effective solution for pet owners seeking pest control without compromising their pets’ well-being.
Following Instructions
By understanding its pet-friendly formulation and following the easy application instructions, you can maintain a bug-free environment while keeping your furry friends safe.
Keep in mind –
A happy home is one where pets and bug-free living coexist harmoniously with Ortho Bug.
Have you encountered pet-safe bug control challenges before? We’d love to hear about your experiences and any additional tips you may have. Please share your insights and stories in the comments section below. Let’s create a vibrant community where we can learn from one another!
Found this article helpful? Share it with your fellow pet owners and gardening enthusiasts to spread the word about pet-safe bug control. Together, we can create a safer and healthier environment for pets!
Pest Control Tips And Tricks That Work In 2024
You may have heard that the best way to get rid of pests in your home is never to allow them to come in in the first place. With this key counsel in mind, you may therefore wonder, how you can keep your home free from those pesky pests that want nothing more than to invade your home.
Read along with us and discover all the best pest control tips for 2024 so that you can live worry-free and pest free.

Close Any Entry Points
If you have the tendency to leave your doors and windows open then you may as well be welcoming all the outdoor wildlife inside. However, even if your door is closed there is still a massive gap underneath and some gaps around the sides.
Close this up with caulk and a door sweep underneath so there is no obvious point of entry. You may also want to check for similar entry points where you have utility pipes entering your home.
Add Some Screens
If you want to get some fresh air in your house that is always a good idea. However, you should make sure that all your windows are properly screened and that any dryer vents or other ventilation coming into your home is also protected in like manner.
Good airflow will help keep you free of pests but only if you have screens to prevent their entry. If you have screens but they have holes then you also need to repair them asap.
Make Home Repairs
Talking of repairs, pests will take advantage of any worn down or disintegrating parts of your home. Whether this is the walls stucco or something in the foundation or weather stripping, you should regularly have a deep inspection of your house and check for damages.
Once weak points have been identified you can issue the repairs in a timely manner and avoid giving any pest the chance to invade.
Keep The Area Clean
Cleanliness is key to keeping out infestations and unwanted visitors. Whether this means cleaning out your gutters regularly, sweeping your floors, or safely disposing of your trash, the better you can clean in and around your home, the safer your house will be.
It is important to remember that whenever something might be unappealing to a person in its lack of cleanliness, this is basically a giant sign to pests saying “Welcome Home”.
Check For Wood wear
Another thing to review in your house is the current status of all the wooden parts of your house. Wood is easier to get through than concrete or other harder materials but it is also more susceptible to the elements and wears and tear.
If you have damaged or decaying wood in your house, a rodent could easily get through it without much trouble at all. Additionally, any decaying wood even outside your house can make a lovely home for ants or termites, and other critters.
Have A Tidy Garden
Whilst most people think that pest control is just keeping pests out of your house, your garden has a great deal to do with it. Improper compost heaps, loose leaves, rotting fruit, mulch, dead plant matter and more can make for the perfect environment for many pests.
You should therefore clear away any plant matter or rubbish and keep your grass cut low. It is also important to keep any mulch away from the foundations of your home.
Avoid Stagnant Water
Last, of all, you need to clean up any areas where water gathers and sits. Stagnant water can not only be a haven for pests but can also at times become dangerous breeding sites for mosquitos and more.
Fix any water leaks, fill any puddles, and empty all water containers holding still water. This can also include the regular cleaning of birdbaths.
Best Cattle Ear Tag Applicator & Buying Guide
After researching a huge list we listed the best cattle feed mix and related items for you…
Recommended to read:
generic 100PCS Numbered Sheep Ear Tags with 1 Livestock Ear Tags Applicator for Sheep Cow Cattle Dog Pig Ear Tags Numbered Plastic Animal Tag
- Simple installation: Sheep Ear Tag Plier is very simple to install, and it provides a lot of help for your farm livestock management. Livestock Ear Tag Applicator for Cattle Sheep Pigs Cow adopts hydraulic principle, vertical pressure, integrated design, very durable and labor- saving.
- Multiple uses: Number Plastic Livestock Ear Tag Animal Tag is an excellent choice for animal breeding populations, epidemic prevention and control, and isolation. Blank ear tags allow you to carry out unique DIY engraving.
- Scope of application: Ear Tag Applicator for Goat Sheep Cow Cattle Ear Tag This design is suitable for small livestock or animals, such as pigs, sheep, cows, deer, dogs, etc.
- Convenient and quick: Numbered Goat Ear Tags will not be stuck when used, flexible to use, convenient and labor- saving, less bleeding, and no bends. The ear tag pliers adopt the latest vertical retraction technology to alleviate the pain of animals.
- Environmentally friendly ear tags: Numbered Ear Tag Pliers for Pigs Mark Applicator with Pins. The ear tags are bright in color and not easy to fade. Very suitable for information management of livestock and animals. The ear tag applicator makes ear tag placement easier and saves labor.
Gozier Livestock Animal Goat Sheep Lamb Cattle Ear Tag Tool Plier Applicator Tagging Tagger Puncher Ear Tag Caliper
- High-quality aluminum alloy, durable paint shell never rust.
- Anti-slip human body mechanics designed handle is comfortable to use.
- The ear tag pliers uses thickened spring for strong springback force and durability.
- Deep jaw makes ear tag placement easier. Automatic lock, Easy to use, Saving time and effort.
- This ear tag plier can be used in most livestocks or animals, such as pig, sheep, goat, deer, dog, and so on.

Ear Tag - Livestock Animal Ear Tag Pliers with Spare Pin for Installing Pigs Cattle Sheep Ear Tags
- This pliers is made of high quality steel with paint plating surface for rust and corrosion resistance, long service life
- The operation is simple, traditional installation way, fast and convenient, easy to use
- The ear tag pliers uses thickened spring for strong springback force and durability
- Anti-slip human body mechanics designed handle is comfortable to use
- Comes with a spare pin that can be used to replace damaged one

GOOG Livestock Ear Tag Applicator Animal Ear Tag Pliers Tagger for Goat/Pig/Sheep/Cow
- Material: aluminum alloy
- Used for the punch hole in the ear of livestock or animals, such as pig, sheep, goat,deer, dog, and so on.
- Size: Length:19cm; Ear Hole Diameter: 0.9cm
- NOTICE: The male tag with nail must be used together with female tag to ensure stability.

LMJHF Livestock Ear Tag Plier, Animal Goat Cattle Pig Ear Tagger Puncher,for Installing Pigs Cattle Sheep Ear Tags
- Feature: Base on the lever principle, Livestock Ear Tag Plier makes ear tag placement easier, save labor, save effort and safety, reduce pain, which is soft, flexible, durable.
- High quality: The pliers is made of high-quality alloy material with paint plating surface for rust and corrosion resistance, long service life.
- Reduction of Pain: The ear pliers has a small aperture, the ear hole is round, and the gap is small, which reduces the pain of the animal. The livestock wound will heal quickly and heal within a few days.
- Easy to Use: The handle of the ear tag pliers with non-slip ergonomic design is very comfortable to use, reduce hand fatigue caused by long-term operation. The operation is simple and easy to operate.
- Best Service: If you have any questions during your shopping, please contact us by e-mail, we are wholeheartedly served you.
People are now getting concerned about animals’ rights and safety. Getting the best cattle ear tag applicator is an absolute need for maintaining animal safety.
If your job is dealing with a large number of animals then buying the best applicator will make your life easier.
Now, there are abundant numbers of cattle ear tag applicators in the market with different prices. How would you know which applicator is violence-free? It is a must to buy such kinds of applicators which will not rip off the ears of cattle.
So,
Before you buy a cattle ear tag applicator you should check the materials and design of the applicator. User-friendly designs of the applicator will save the animals from getting hurt.
Contents
User-friendly materials
The finest quality of the material of the product makes the product durable. Before buying a cattle year tag applicator you should know what materials make an applicator user-friendly. The rust-proof property of the material ensures the longevity of the applicator.
The best applicator is one that is made up of stainless steel. It is important to buy an applicator with anti-rust property.
Also,
The manufacturing material should be lightweight. With the light-weighted applicator, you can easily carry and mark ear tags on the cattle. Marking the cattle with a heavy ear tagger is quite hard. You will not be able to manage both the cattle and the heavy applicator at the same time.
The ergonomic design of the handle
An applicator with a good design will not cause any inconvenient situations for the user. It must be designed by maintaining the comfort level of holding the applicator.
Before buying an applicator you should check whether the material used in the handle is slippery or not. A slippery handle will make you work hard. Also, animals have a higher chance of getting hurt if the applicator is slippery.
So, the user needs to search for an applicator that has anti-slip properties. It makes the ear tag applicator convenient to use.
Automatic separation after marking
The ear tag applicators that gets separated automatically after applying the ear tags are the best cattle ear tag applicator.
An applicator with a thick spring mechanism or vertical rebound technique has the auto separation function. So, such kind of applicator does not have any possibility of getting stuck on the cattle’s ears. It will automatically get separated from the ear without causing excess bleeding.
Also, applicators with springs are easy to use as the user does not have to remove the applicator by himself.
Rotating Property
Cattle are usually quiet but they sometimes might cause trouble while putting an ear tag. Too much movement of the cattle might rip their ears off. So, to prevent the applicator to rip off their ears it is important to have an applicator with rotating properties.
The pain of the ear tag is the main element that needs to be rotated. You should check whether the applicator can rotate the pin 90 degrees or not. This rotating property will make the pin flip forward if the user gets pulled apart from the animal. So, this will abolish violence towards the animals and also save your labor.
Applicator with a lock-designed system
Some applicators come with the property of locking the applicator. Having a lock system in an ear tag applicator is not important. But it becomes an important factor when you have children in your house.
FAQ
No, applying ear tags on cattle does not hurt them at all. It might feel like a little pinch. You can relate the whole process with the ear piercing of people. The process is as same as putting earrings on people.
How to apply a cow ear tag?
Before applying an ear tag it is a must step to disinfect the applicator. You can use any kind of disinfection solution for this purpose. Then use the applicator to mark the ear tag in the middle of the left year of a cow. Also, keep in mind that the ear tag must be placed in between the two cartilage ribs of the left ear.
On the ear tag of a cow usually, information like birth date, ID number, sex, color, etc. are usually noted down. This information helps the farmers to differentiate their cattle from each other. ID number helps to keep a count of the total number of cattle.
Conclusion
Getting yourself the best cattle ear tag applicator will save the animals from getting injured. It is the quality of the applicator that will make your work easier. So, make your work easy and convenient with the best applicator in the market.
How To Mount Insects In a Shadow Box?
Preserving and displaying insects is part of education and art. Some people preserve insects in frames to keep in their arthouse. Some people mount insects for museums or encyclopedia books.

But an inexperienced person should not perform the mounting process of the insects.
Insects are delicate and you can easily lose their wings or body parts if you don’t take them cautiously. If you’re mounting insects for an experiment then you have to be careful otherwise you will lose the important body parts of an Insect.
If you don’t know How to mount insects in a shadow box, then you have to research a lot before performing. This article will help you to be a part of your research and you can mount the insect in a shadow box.
Things You Need To Mount Insects In a Shadow Box
The tools for mounting insects in a shadow box have to be near your hands so that you can get them whenever you want. You can buy those tools from any market near your home.
But make sure all the tools for mounting insects should be high quality and specially designed for insects.
For example,
Do not get regular pins to nail the insects otherwise, the pins will get rusted over time. You have to buy insect pins to nail the insects.
You can get an insect mounting kit from the market and mount insects in the shadow box.
You will get every single tool you need for mounting insects. Or you can make your mounting kit with
- Insect collecting net
- Hand magnifier
- Measuring magnifier viewer
- Feather light
- Spread board or foam board
- Insect pins
- Plastic specimen tube
- Shadowbox
- Glass to cover the box
- Gloves
Recommended for you
Process of mounting insects
The first step in mounting insects in a shadow is to catch an insect of your choice. You need an insect collecting net to catch the insect and keep it. Make sure you’re catching a big-sized insect because small insects are hard to pin and preserve.
Make sure to gently remove the insect from the insect collecting net wearing gloves. Because if you don’t wear gloves while removing the insect, the sting or teeth of the insect can harm you.
So make sure you’re being careful with gloves while removing the insect from the net. Also, be gentle while getting out the insect from the net because insects are delicate.
The second step is to choose the shadow box depending on how many insects you are going to mount in the box. A small shadow box is around 4 to 6 inches wide and a large shadow box is around 16 to 20 inches.
After choosing the shadow box,
The 3rd step is to cut the foam board. You are required to cut a portion of the colored felt. Make sure the cut is one inch extensive on both sides of the foam board. One side of the foam board needs to be enclosed and needs to be stuck back to the foam board with glue. You have to use glue for insect mounting to stick the foam board.
Now gently fold the corners of the foam and chop extra left-out foam with the cutter. Make sure to stick the felt-covered foam board on the inside of the shadow box.
The next step is pinning the insect to the foam board. You have to make sure the pins are not regular pins to ascend the insect.
Insect pins are very significant while mounting the insect in the shadow box. But before pinning the insect make sure to kill it with an insect-killing agent or put the insect in the freezer for 8-9 hours. It will kill the Insect eventually.
After freezing insects for 8-9 hours, take them back from the freezer and let them thaw for some house. The insect has to be malleable enough so that you can pin them. Keep in mind you have to pin the insect before it dries.
Now into the shadowbox, organize the insects and use straight pins to ascend the insects. You have to mount the insects on the felt-covered foam board. Brace the insect in a position of a 90-degree angle through the thorax.
Hoppers and beetle should be clamped through the front part of the right wing. Make sure the pin is not damaging the leg while emerging from the insect’s bottom.
Now use the glass piece that you kept for the shadow box. Put the glass piece as the lid of the shadow box and cover the box. Now the shadow box is ready to be mounted.
You can put the shadow box anywhere. You can hang the shadow box or put it in the cabinet or the table as a showpiece.
Insect Specimen Shadow Boxes
Cautions
Follow the right rules of caution before you catch and mount an insect in a shadow box. If you don’t take any precautions before mounting any insects in a shadow box then you might face problems.
Make sure to sanitize every tool before you use them to mount insects.
Otherwise,
Bacteria will attack the insect and the insect will disintegrate in the box. Use gloves after catching the insect to avoid stinging and hitting from the insect.
Make sure to perform the mounting process very carefully so that you don’t lose any body parts of the insect. Keep away the shadow box from the children to avoid any kind of damage.
How To Preserve Insects For Mounting
Before you mount your Insects in a shadow box, you need to preserve them so that the insects don’t disintegrate.
If your insect is soft-bodied then preserve it in plastic or glass vials with 70-80% isopropyl alcohol. You can also preserve other insects in the alcohol as well.
Butterflies, moths, and bee flies should not be preserved in alcohol otherwise the school will damage their wings. You can preserve larvae, thrips, earwigs, mayflies, etc in the alcohol.
By preserving the insects in the alcohol, the bacteria can not attack the insect. And the insect will be safe from any kind of bacterial attack and will be protected forever. You can also put the labels and tags under the insect for their introduction.
FAQ
How do you show bugs in frames?
You can show bugs in frames by displaying them in envelop or glass frames.
If you want the artistic display of specimens then you can mount them in shadow boxes, glass domes, or glass frames. Shadow boxes and double glass frames can keep the insect safe and preserved.
How do you hang dried butterflies?
You need two strips of parchment paper for each wing of the butterfly. Then keep the wings flat against the spreading board and pin them with Insect pins. But make sure you’re not pinning the wings of the butterfly or the pin can ruin the wings.
Then after pinning the butterfly, let it dry and keep it in a warm area to dry properly for four weeks. And check if the butterfly is dry and ready to be mounted.
How do you start bug taxidermy?
You need to discern some basic rules in order to taxidermy insects.
Relax your insects before pinning them to be hard and brittle. Just wait for a few days until the insects are brittle then you can start the taxidermy process. Then pin the insects on the foam board in the same process as pinning other insects.
Then mount the insects in the display case or in the shadow box to finish the taxidermy process of the insect.
Where do you place a Bug Box?
You should place a bug box in a warm and dry place on your balcony or another place where sunlight can reach. You can leave the bug box in the planted container.
Also,
Display the bug box in an art house as part of your art. You can use the bug box as an experiment for your school project as well. But make sure to keep the bug box away from children and other living insects to protect the bugs.
How do you make a relaxing chamber for insects?
You require decent sand and put them in the bottom of a large airtight jar. You have to place one or two inches of sand or you can use sawdust to make a relaxing chamber for insects.
You have to choose a large jar to place dishes inside it. The container needs to be airtight and sealed to create a relaxing chamber for insects.
Conclusion
Whether it’s for an art display or your school project, knowing how to mount insects in a shadow box will help you to gain more knowledge about insect anatomy.
You will be experienced and can help your junior or siblings to mount any insect in a shadow box. Mounting insects are a part of art and history.
People will know more about the insects that don’t live in this world anymore. The insect’s mounting process is a hard yet delicate process to perform and it should be performed by an experienced hand.
How To Preserve A Caterpillar?
Preserving insects are a traditional method that people are doing for their art museum or experiment.
Also,
Even colleges preserved insects for their educational experiment. Insects such as bees, wasps, butterflies, caterpillars, etc can be preserved and pinned in a shadow box or an envelope.
An experienced hand is much needed while preserving insects otherwise inexperienced people can ruin the insect. But people who don’t know how to preserve a caterpillar can read our article for insight into the preserving method.
You can learn different types of methods for soft-bodied insects and hard-bodied insects. Caterpillars are soft-bodied insects that’s why they need a lot more gentle hands to perform the preserving method.
Contents
The Process Of Preserving A Caterpillar
The process of preserving a caterpillar is as simple as preserving other insects. The difference is that the caterpillar has a soft body, which means you have to be gentle with the caterpillar while preserving it.
Things you need to preserve caterpillar
The most important thing you need to keep in mind while preserving the caterpillar is that you require every tool near your hand. The tools are
- Insect killing agent
- An airtight container
- Insect pins
- Spread board or butterflyboad
- Gloves
- Envelope or shadow box
First,
You have to get a caterpillar to preserve it. Make sure to wear gloves whenever you’re attempting to preserve a caterpillar. Catch the caterpillar gently because it has a soft body and your hard press can ruin the caterpillar.
Various methods have been trying to preserve caterpillars and every method needs different tools. The only common ingredient is alcohol where we need to submerge the caterpillar.
Method one: the first method is to submerge the caterpillar immediately into a container full of alcohol after catching it. That means you have to carry an airtight container that is filled with alcohol and drench the caterpillar in the alcohol.
You can use rubbing alcohol which is 70%. You don’t have to use any stronger alcohol to preserve caterpillars because they have soft bodies.
Then you can keep the caterpillar in the container and keep it as a showcase.
Method two: another method of preserving caterpillars is to preserve them by boiling them. You take the caterpillar and immediately boil the caterpillar so that you can fix the protein of its body.
By doing the boiling process, your caterpillar will not turn black and it will be well preserved. After boiling the caterpillars place them in the jar of alcohol so that the caterpillars are preserved.
Those larvae should be placed in boiling water for 1 to 5 minutes. After that, you need 70% to 80% alcohol to dip the caterpillar.
These two methods are the most widespread procedures for preserving caterpillars. You have to be careful while boiling the caterpillar because if you boil too much then the caterpillar will be destroyed and soggy.
Make sure to boil the caterpillar only for 1-5 minutes according to its size.
Recommended to read:
After preserving the caterpillar in the alcohol you can keep the caterpillar in the container with alcohol as a liquid preservative.
Otherwise,
You can pin the caterpillar and showcase it with a shadow box or in an envelope.
But soft-bodied insects should not be pinned on the breadboard but some people pin them. If you’re a student and not a beginner then we recommend you keep the caterpillar in the glass container with liquid preservation.
Because if you’re not experienced then make sure to preserve the caterpillar with adult supervision.
How to take care of a caterpillar!
Cautions
Caterpillars are gentle, and that’s why being gentle while preserving them is a must.
Also,
You are going to work with alcohol so make sure to wear gloves if you’re preserving any insects.
Carefully pin the insects and make sure to use insect pins instead of ordinary pins. Ordinary pins can get rusty after some time and can destroy your preserved insect.
Keep in mind that every tool you’re using has to be sanitized so that the bacteria can not attack your caterpillar. Caterpillar has a soft body and it can be destroyed easily by bacteria.
Do not overboil the insect in the water otherwise, you might ruin the protein of the insect. Make sure the insect is soft-bodied then you should keep it in liquid preservation to preserve it.
FAQ
How do you preserve Fuzzy caterpillars?
Dried caterpillars are usually fuzzy and you can preserve them in the freezer or with silica gel.
Can I preserve a bug in alcohol?
If the bug you’re going to preserve is soft-bodied then you have to keep them in 70-80% alcohol which is isopropyl or ethanol alcohol. Usually, bugs that have soft bodies should be placed in a liquid preservative. You have to keep the insect in a glass jar filled with alcohol.
The alcohol has to be 70%-80% isopropyl alcohol. Or you can use rubbing alcohol and put it in an airtight jar. Make sure to keep the caterpillar in an airtight jar or container to preserve it properly.
What liquid do you use to preserve animals?
The most common fixative that preserves animals is formaldehyde. Sometimes they use formaldehyde and water solution to make formalin and preserve animals and insects.
And some people use isopropyl alcohol to preserve animals and insects.
What is dry preservation?
Dry preservation is a method where they remove enough moisture from the food and preserve them. They dehydrate the food and remove all the moisture from it so that bacteria could not attack the food and preserve them. Dried fish and dried fruit are also the results of dry preservation.
Conclusion
Whether it’s your hobby or you have a project for college, preserving insects is the toughest yet most enjoyable stuff. You can enjoy preserving insects with your children or your siblings.
But if you’re not an adult then make sure to perform insect-preserving methods under adult supervision. Make sure to read all the cautions and take precautions before you perform any insect-preserving method.
Make sure to enjoy every moment while preserving insects.
Best Broadleaf Herbicide For Pastures & Buying Guide
After researching a huge list we listed the best broadleaf herbicide for pasture items for you…


Recommended to read:
Contents
List of The Best Broadleaf Herbicide For Pastures Reviews
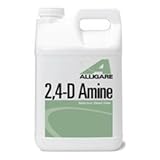
ALLIGARE 2,4 D Amine Herbicide 2.5 Gallon- Broadleaf Weed Killer
- 2,4-D Amine 46.8%
- Alligare 2 4-D herbicide can be used in pastures, forests, lawns, industrial sites, and aquatic sites.
- Mix 1-2 ounces of 2 4-D Amine per gallon of water.

Weedar 64 Broadleaf Herbicide 5 Gallons (2 x 2.5gal)
- Broadleaf Herbicide
- 2,4-D Amine Weed Killer
- 46.8% 2,4-Dichlorophenoxyacetic acid, dimethylamine salt
- 5 Gallons = (2) 2.5 gallon jugs
- DOES NOT SHIP TO PO BOXES
Sale

Remedy Ultra Specialty Herbicide Weed Killer & Brush Control At Rangeland, Pasture and Fence Lines, Triclopyr Concentrated, Use Alone Or Tank Mix With GrazonNext/ForeFront HL Herbicide, 1 Gallon
- Flexible, long-lasting, ideal for pasture restoration, encroaching brush, maintaining fence rows and general brush control.
- Controls more than 35 brush species, as well as many important broadleaf weeds.
- Low-odor. Works on the entire plant roots and top growth.
- Safe to use around children and pets when applied according to the product label.
- Always wear a proper protective equipment when mixing and when applying. Do not enter treated areas for at least 12 hours.
Weed grows all the year, and it is annoying to kill the weeds for pastures.
Weeds make an appearance every year again and again and we have to face a lot of issues throughout the year.
Everyone is low-key tired of taking weeds out and the best broadleaf herbicide for pastures is here to get you out of this problem.
When it’s time to herbicide the broadleaf, you need a top-notch solution for this. But everyone doesn’t have knowledge of broadleaf herbicide.
That’s why our buying guide will help you get the best broadleaf herbicide facing no problems.
Active Ingredients
You have to see very carefully if your weed killer includes active ingredients or not. Carefully check if they have given any disclaimer in the ingredient list or the package.
You have to make sure your weed killer’s ingredients are safe for humans and pets and then you can add to this in your cart.
Also,
You have to make sure they added some of the most important ingredients to your broadleaf herbicide.
- AMINOPYRALID is a well-known broadleaf herbicide to kill the weeds for pastures. The picolinic acids of the herbicide class contain clopyralid, picloram, and some less popular herbicides.
- Another weed killer, that is also known as triclopyr, is used to manage woody plants and broadleaf weeds. You can apply this broadleaf herbicide in agriculture fields, plantations, grassland, and permanent grass pastures. This broadleaf herbicide hoards the meristematic tissue of the plant and helps to prevent them from growing further.
These types of major ingredients will help the weed not grow frequently.
That’s why you need to check the ingredient list of broadleaf herbicides to make sure the active ingredients are included.
Best Broadleaf Herbicide For Pastures
The Right Time For Application
Applying the broadleaf herbicide at the wrong time won’t help to kill the weed. You have to check the age of the weeds before applying the broadleaf herbicide.
The chemicals of herbicide work well when the weeds are small and at a young age. Make sure to note down the level of development of the weeds before you apply the broadleaf herbicide.
If
The weeds get mature, then the potency of the herbicide doesn’t work. The herbicides can work in the long term if the weeds are mature and old.
In the fall season (October to November)
- The weeds such as buttercup
- Biannual thistles
- Poisonous hemlock starts to appear
This is the right time to apply broadleaf herbicide because the weeds just started to appear and they are still small.
You can also apply the herbicide in the early spring (March to April).
The annual summer weeds are
- Common ragweed
- Cocklebur
- Spiny amaranth start to appear in early summer like June
So
Make sure to treat the after winter and early summer.
Some perennial broadleaf weeds are
- Tall iron weeds
- Curly dock
- Canada thistle
Need to be treated in early summertime (August to early September).
If
You perform the herbicide treatment in mid-summer with annual weeds then the herbicide will work wonders on them.
Make sure you have the knowledge of types of broadleaf so that you can apply the herbicide at the right time.
The Quantity
Applying the right volume or quantity will determine the prevention of the weeds. You have to be careful while using the right tool to apply the broadleaf to the weed.
You have to create bigger droplets and to do that you need bigger spray tips for spraying. 15 or more gallons of freshwater needs to be handled per acre of area.
You can increase the spray intensity to reach higher spray concentrations. The higher spray concentration will result in finer droplets reaching every corner of the grass field.
Make sure to read the description and take the right quantity of the herbicide to get rid of all weeds from the field.
Cautions
Do not spray the herbicide during the hot season to avoid the risk of the pastures. You can spray when the plants are growing but they are still small.
Make sure to use 4 quarts per acre of spray, or you can apply 2 ounces per one gallon of spot spray. Target the delicate plants that are still growing vigorously.
Do not target the non-weed plants
Because
They will be destroyed if they come in contact with the herbicide. You have to be very cautious while applying the herbicide and make sure non-targeted plants are safe.
FAQ
What is the best pasture spray?
If the cause of the problem is woody plants, then spike, Gordon, remedy, surmount, pasturgard will be the best option for you. But you can also use herbicide on grassland as well.
When should I spray my pasture weeds?
3-6 weeks after sowing is the best time to spray herbicide on your weeds in the new pasture. The weed has to be 70% ground covered while you’re about to spray herbicide.
Conclusion
Before investing in a new herbicide for pasture, make sure you’re reading the best broadleaf herbicide for the pasture buying guide.
This article will be helpful to you by keeping you on the right track. Some products can be expensive so make sure you’re researching enough before buying broadleaf herbicide for pasture.
Do Moths Eat Wood? A Detailed Discussion
Most people do recognize moths but they don’t know the foods that moths eat to survive. Moths are usually eating things around us.
But sometimes we are unaware of what kind of things moths can eat. If you don’t know whether do moths eat wood or not then this article will help you to find out.
Sometimes you can see holes in your clothes and might think of another insect. But you don’t know moths can eat your clothes and other materials in your house. Although moths are harmless, they can be the main source of nuisance.
Contents
What Do Moths Eat?
If you think about moths, you will see a lot of species that eat different types of food. That means there is a certain category available for moths that eats certain types of food.
For example, Clothes moths will eat only clothes and will make holes in your clothes.
There are other types of moths that are carpenter moths that eat rotten wood and other types of wood. Almost every adult moths only drink liquids such as tree sap, flower nectar, rotting fruits, etc.
Adult moths only drink fluids to gain energy and maintain hydration in their body.
Adult clothes moths are smaller in size ( usually ½” in length) and they are grey. Some adult moths have a beige hue to their color. These types of moths avoid light and usually live in dark. They are narrow and have hairy wings. And adult clothes moths only need clothes and fabrics to survive.
Adult Pantry moths are slightly different than adult moths but most people can not define the difference between them. Adult pantry moths are ½” in size with narrow bodies and hairy wings. The wings are grey but the body is reddish-brown.
Adult pantry moths have black stripes around their body. These strips differentiate the adult pantry moths from adult clothes moths. You will find them in your kitchen and pantry area.
These pantry moths usually survive by eating food and other goods. You will also find them in pet food, dry pasta, birdseed, dry foods, etc.
Recommended to read:
Do Carpenter Moths Eat Wood?
Before getting to know whether carpenter moths eat wood or not, let’s know about their life cycle.
The origin of carpenter moths came from the family name Cossidae. These moths are usually born in woods and they are nearly hairless larvae.
Carpenter larvae only live for 3 to 4 years. Adult carpenter moths have vestigial mouthparts, gray to brown wings, and long thick bodies. The length of the wing of carpenter moths varies from 2.5 cm or 1 inch to 25 cm or 10 inches.
The female moth that is an adult often lays eggs in a wrecked part of the tree. Sometimes they lay eggs in the damaged branch of trees.
After laying eggs, the eggs started to hatch and the caterpillars come. After some time, the caterpillars started to grow and they started to eat into the tree and make big tunnels in the heartwood.
If you see any dark sap spots on the outside of the tree then it will be a sign of carpenter moth infestation.
You will see holes outside of the tree and sawdust coming from the hole, it is also a sign of carpenter moths that are eating wood. The caterpillar frass comes as wood particles because the moths eat wood.
Another sign of carpenter infestation is seeing empty pupal cases midway into the tunnel. The moths pupate inside the tunnel but the pupas are pushed by themselves out of the tree.
After browsing this portion of the article, you might concede that moths do eat wood.
Carpenter Moths Vs Clothes Moths
Both carpenter moths and clothes moths are known to you. Because you have to face both types of moths.
Sometimes you will find clothes moths eating out your clothes. And sometimes you will find carpenter moths destroying your tree. But do you know the difference between Carpenter moths and clothes moths?
A moth onslaught is already a nightmare for all of us whether it’s carpenter moths or clothes moths.
You will find two kinds of clothes moths that will creep you out by making holes in your clothes.
These two types of moths are webbing moths ( Tineola bisselliela) and case-making moths ( Tinea pellionella). These moths are very small in size and both of them have different body colors that differentiate them from each other.
On the other hand,
Carpenter moths are totally different from clothes moths. The wingspan of carpenter moths is from 9 to 25cm. Most carpenter moths have grey bodies and long narrow wings. They have a few smooth hairs which clothes moths don’t have.
Most Carpenter moths eat wood, rotten wood, tree branches, and tree sap to survive. The moths can only eat wood and survive for the rest of their life.
And clothes moths only eat fabric and clothes and make holes into the clothes. You will find carpenter moths in the trees, damaged trees, rotten wood, etc.
And most clothes moths live in your wardrobe and eat all of your clothes including luxurious fabrics.
How To Get Rid Of Moths That Eat Wood?
The extensive grazing of carpenter moths can result weaken tree branches. The branches can break in high winds if it’s been eaten by moths.
Moths that eat wood can make your tree weak and the tree can lose its nourishment. To get rid of moths that eat wood, you have to discern some crucial steps.
By doing that,
Your trees will be healthier again and the moths can not eat wood anymore.
Monitoring
The first step in getting rid of carpenter moths is to monitor the tree. You have to determine if the tree is attacked by carpenter moths or not.
You have to see dark sap spots on tree branches and trunks. A large amount of wood frass sawdust will come from the tree if it’s been attacked by the moths. Or you might notice pupal cases in the tunnel of the tree if your tree has wood moths.
The discolored limb and oozing bark will confirm that the tree has a carpenter worm. Make sure to research well before getting rid of carpenter moths because a tree can lose its color for many reasons.
But carpenter moths are the number one reason for the discoloration of a tree.
Management
Perfect cultural management can protect your trees from carpenter moths. You need appropriate irrigation to get rid of moths that eat wood. A tree can tolerate a few carpenter moths but too many carpenter moths can destroy a tree.
Have a qualified arborist if you notice too many carpenter moths in the tree. The process of carpenter moths feeding can emerge the breakage of tree limbs.
You might need to remove the limb back to the point if it’s heavily infested by carpenter moths. In some cases, you might need to remove the entire tree if it is heavily plagued with moths.
You can kill the larvae by poking a sharp, long wire into a particular branch. You can use this method when the carpenter moth infestation is small. But it won’t be beneficial to heavily infested trees.
You can spray a special medicine that is available for carpenter moths. But that spray is not effective for larvae.
How To Get Rid of Clothes Moths
Clothes moths are the most annoying insects that can destroy your beautiful clothes.
Now if you don’t know how to get rid of clothes for months then you might lose your favorite dress.
You have to dry clean all your (dry clean) clothes before you store them in the closet. The clothes need to be washed with hot water. You have to wash them at 120°F for at least 20 to 30 mins so that all the moths can get rid of your clothes.
Also,
Your clothes require laundry before you store them in the wardrobe.
There is an old-school way where you can get rid of your clothes moths. You have to dry the clothes in the sunlight and you have to brush the clothes frequently to get rid of clothes moths.
Larvae can not tolerate the sunlight and when you brush them the larvae come out from the clothes. You need to hang the clothes under the sunlight for several hours and let them soak into the sunlight. The larvae will fall from the clothes and will make your clothes fresh again.
You can use some essential oils to get rid of clothes moths. Lavender and rosemary essential oils are best to get rid of clothes moths. The fragrance of lavender essential oil triggers the clothes moths and they leave the cloth.
Mothballs are another strategy to get deprived of clothes moths from your clothes.
A chemical called 1,4-dichlorobenzene contains in the mothballs that suffocate moths and larvae. The mothballs are the most useful and effective technique to get rid of clothes moths.
You have to be careful while using mothballs in the cloth and make sure to wash your clothes afterward. Because mothballs are poisonous to children and pets.
We have mentioned some simple steps to get rid of clothes moths. But you can find more strong chemicals in the market that can destroy clothes moths in seconds. Keep in mind to protect the moth medicine from the children and your pets.
Moth medicine can be poisonous for humans and animals so make sure you’re being careful while applying for the medicine.
The Truth About Clothes Moths
FAQ
What kills carpenter moths?
A nematode that is also known as Steinernema feltiae or S. carpocapsae is available on the market that can kill carpenter wood. You have to spray or Inject the medicine into the hole. The nematodes will kill the Carpenter moths that are destroying the tree.
How does vinegar get rid of moths?
You can use vinegar to get rid of moths. You have to wipe down the vinegar on the surface and the fragrance of the vinegar will kill the moths. Moths can not tolerate vinegar so whenever you put vinegar into the surface, the moths will die.
What do moths hate the smell of?
Dried rosemary, thyme, cloves, lavender, or bay leaves are the best fragrance that most moths hate. Put all the ingredients into a cloth and make the larvae fall from your clothes. Hang the cloth in the wardrobe or closet or you can hang the cloth around your other clothes. The smell of the ingredients will make the larvae get out of your closet.
Are carpenter moths bad?
Carpenter moths are bad for your trees. Carpenter moths will make your trees weak and result in weak limbs. The carpenter moth can break the tree branches and destroy your trees. The tree leaves started to fall and the tree branches started to get weak if your tree is infested by carpenter moths.
What do carpenter worms look like?
The carpenter moths look greyish to brownish on their body. They retain distinguished hairs on their trunk. They also have unusual abdominal prolegs.
Why do you get clothes moths?
The perspiration of foods and stains attract the clothes moths. If your wardrobe is not air-ventilated then it has a higher chance of getting attacked by clothes moths. If the clothes moths once attack our closet, all of your clothes will have holes. Your luxurious dress and fabrics will be destroyed by the clothes moths.
Conclusion
Moths look virtuous but they are dangerous insects that can destroy your belongings. Having moths in your house is like having nightmares that creep you through your belonging.
Nobody wants unwanted guests (moths) in their house that are ruining their daily things.
But what terrifies Is the carpenter moths that are destroying your favorite trees.
Those carpenter moths are dangerous and destroy your trees and other trees. That’s why being careful is crucial if you see a single moth in your tree. Whether do moths eat wood or not, they are still harmful to your trees.
How To Preserve Dragonfly (Easy Way!)
People preserve insects for their educational purposes or their hobbies. And dragonflies are the most common insect to preserve.
In colleges,
They use the dragonfly to teach about anatomy. Or some people preserve to keep them in their art-house.
No matter what the purposes are, preserving insects is a delicate art. You need someone with experienced and gentle hands to preserve those fragile insects.
We have to be careful while preserving dragonflies because they have delicate wings.
If you don’t know how to preserve dragonflies, then this article will give you the knowledge you wanted.
Most butterflies and dragonflies are fragile, and you have to be careful while preserving them and pinning them.
Suggested for you:
Contents
Preparation Before Preserving A Dragonfly
You will need some tools to catch the dragonfly and also need more tools to preserve and pin them. Make sure all the important tools are near your hand before catching or preserving a dragonfly.
Things you will need to preserve a dragonfly
- An insect net to catch dragonflies
- An airtight plastic container to keep the dragonfly
- Acetone to preserve dragonfly
- Butterfly spreading board or styrofoam
- Wax paper
- Pins to pin the dragonflies
- envelope or display case to keep dragonfly fly
The process to preserve a dragonfly
First,
Go outside of your house and catch some dragonflies with an insect net. You can not get to see dragonflies every time so you have to be comprehensive about the right time to catch dragonflies.
Sometimes the dragonflies come mid-morning or in before the sunset from 5 pm to 7 pm.
Make sure you are taking small steps while catching a dragonfly.
Because they hear small details around them and can fly away if there is any noise. Go slowly and put the insect net over the place where the dragonfly is sitting.
After catching the dragonfly, your next step is to kill it.
But make sure to be delicate while taking out the dragonfly because their wings are weak. Hold both wings of the dragonfly and make their abdomen straight.
Now take your airtight container and keep the dragonfly into the container. You have to place the airtight container in the freeze for 24 houses to execute the dragonfly.
You can also make a killing jar for the dragonfly to kill. Just fill the airtight container half quarter with absorbent material and Acetone (nail polish remover) until the liquids are absorbed.
Then place the dragonfly into the container. Keep in mind there should be no liquid remaining in the container while placing the dragonfly. Then leave the dragonfly inside the jar and make sure it does quickly.
After the dragonfly dies, take it out from the 1st jar and place the dragonfly into a second jar that is filled with acetone. Soak the dragonfly in the acetone for at least 8 hours.
The acetone will help to preserve your dragonfly’s colors. But make sure not to keep the dragonfly in the acetone for too long. Because soaking the dragonfly for too long in the acetone can make it brittle.
If your dragonfly is large then inject its body with acetone to make sure the dragonfly is preserved well.
After 8 hours, take out the dragonfly from the jaar and now it’s time to pin and keep the dragonfly in the envelope.
Process of Pinning The Dragonfly
People apply a lot of methods to pin the dragonfly. But there is a simple yet effective method to pin the dragonfly that you can try even if you’re an amateur.
Get a butterfly spread board or styrofoam to place the dragonfly. Then place the dragonfly on the butterfly spread board. Make sure the dragonfly is still wet when you’re pinning it.
You will need insect pins to pin the dragonfly. Get insect pins in sizes 1, 2, or 3 according to the size of the dragonfly.
Lance the dragonfly through their back in the middle between the front set of wings. Make sure to move the wings gently to get them out of the way.
Then pin the insert pin in the center trench or well of the styrofoam or spreading board. Clamp the body of the dragonfly without piercing with dressmaker pins.
You can place the legs and the wings in a certain position if you want by piecing the legs and wings.
Then take your wax paper strips to place them in between the wings of the dragonfly. And hold the wax paper delicately then keep the wings down to the edges.
Clutch the parts of the wings into directions so the left and right wings are straight. Do not pierce the wings and let the dragonfly dry accurately.
Keep in mind you have to dry the dragonfly for 3 days to 7 days and keep them away from the bugs. When the dragonfly is dry, remove the pins and wax papers.
Then unpin your dragonfly, take it away from the butterfly scoreboard. And finally, place the dragonfly in a display case or in an envelope to show.
FAQ
How do you preserve the color of a dragonfly?
You need acetone to preserve the color of a dragonfly. The color of the dragonfly washes away quickly so you have to preserve the color by soaking them into the acetone for 8-10 hours.
What can I do with a dead dragonfly?
You can preserve a dead dragonfly in a display picture with some simple methods. Put the dragonfly into a kill jar then take it out after 8 hours. Then pin the dragonfly and let it dry. After that let the dragonfly dry and keep them in a display case.
Conclusion
Dragonflies are very beautiful insects and everyone loves to preserve them. But a delicate touch is much needed while preserving a dragonfly. That’s why you need the knowledge of how to preserve dragonflies accurately. And those who don’t know need to know the right method.
Make sure to read our whole article to gather all the knowledge of preserving dragonflies. We hope this article is effective for you to know about dragonflies.
7+ Best Cattle Feed Mix Reviews & Buying Guide
After researching a huge list we listed the best cattle feed mix and related items for you…
Recommended for you
Contents
List of The Best Cattle Feed Mix Reviews
Nature's Seed 2.5 Acre Great Plains Beef Cattle Pasture Blend, Eco Region, (PB-GPBC-2.5-A)
- This blend produces a pasture that will contain approximately:
- 30% Smooth Brome 25% Tall Fescue (no endo)
- 15% Perennial Ryegrass 15% Orchard grass
- 10% White Clover 5% Alfalfa
- Seeding Rate: 20 lbs. / Acre

TruCare 4 Top-Dress Trace Mineral Blend for Livestock: Beef Cattle, Dairy Cattle, Deer, Elk, Goats (Zinc, Manganese, Copper, Cobalt)
- Essential Bioavailable Trace Minerals for the Most Prized Animals in Your Care
- A Prize Blend of Organic, Essential Trace Minerals Developed to Improve Livestock Nutrition
- Benefits: Health and Wellbeing, Skin and Coat, Hoof Health, Digestive Support, Reproductive Performance, Bone and Joint Health
- One (1) 35-Ounce Pouch of Top-dress Trace Mineral Blend Including: Zinc, Manganese, Copper and Cobalt
- Formulated for: Beef/Dairy Cattle, Deer/Elk, Goats (Warning: Contains copper, do not feed to sheep)
Wagner's 13008 Deluxe Wild Bird Food, 10 lb Bag
- Attracts perching and ground birds
- Contains sunflower and general purpose seeds
- Moderately priced valued blend that gets the birds
- Highest quality grains used
- Made in the USA
Sale

Wagner's 62067 Deluxe Treat Blend Wild Bird Food, 4-Pound Bag
- A tasty treat for a variety of lovely perching and ground feeding birds
- Contains sunflower along with colored safflower
- Can be fed in a tube, hopper, or platform feeders
- Highest quality grains used in blending
- Made in the USA
Sale

Manna Pro Goat Mineral | Made with Viatimins & Minerals to Support Growth | 8 Pounds
- FORTIFIED: Manna Pro Goat Mineral is fortified with minerals and vitamins to support sound growth, reproduction, and show appearance. Can be fed to all classes of goats.
- AMMONIUM CHLORIDE: Goat Mineral contains ammonium chloride to help prevent the occurrence of urinary calculi
- ABSORPTION: Goat Mineral contains chelated minerals help ensure absorption and utilization
- MICROBIAL BLEND: Exclusive blend to support digestion
- LOOSE MINERAL FORM: Can be fed free choice

Hatortempt 10lbs Bulk Non-GMO Dried Mealworms for Reptile, Tortoise, Amphibian, Lizard, Wild Birds, Chickens, Duck, Poultry etc
- PTCOM&HATORTEMPT Dried Mealworms- which are the 100% Natural, Non-GMO, No Preservative,No Additives.
- Every links should be checked strictly within production, our mealworms are raised on high-quality feed in good conditions,they're quick-dried in order to insure its crisp and the fragrant and to maximize the flavor that animals crave.
- They are rich in the protein and the fat, crude fiber vitamins and top-grade edible oils. Excellent food source for Bluebirds and other wild birds, Chickens, Ducks,Gooses,Sugar Gliders, Hedgehogs and Reptiles along with others small animals that eating mealworms.
- The convenient firm and resealable zip Top bags which can bring out the mealworms in conveniently. Won't spoil, No refrigeration necessary.It's more affordable than 11 lb dried mealworms
- PTCOM&HATORTEMPT Dried Mealworms can make you receive satisfactory products and can be refund to you if you are not satisfied.
Sale
Kaytee Timothy Hay Blend Cubes 1 pound
- Blend of sun-cured timothy hay and sun-cured alfalfa hay
- Lower protein and calcium supports urinary health
- High fiber hay aids in digestive health
- Provides added nutritional variety
- Complements any Kaytee fortified food
- Grown in the USA
Sale

Morning Song 11995 Squirrel and Backyard Wildlife Food, 10-Pound
- Creates diversion to reduce competition at wild bird feeders
- Includes corn, peanuts and black oil sunflower seeds
- For use in a squirrel or table feeder
- Family owned and American made
Purina Animal Nutrition 0025669 CR All Stock 12 Sweet Textured 50lb
- Purina
- Cross Road All Stock 12 Sweet Feedis for beef cattle on pasture for maintenance of horses and for growing goats and sheep
- Cattle Horses Goats Sheep
- 50 lb
- 25669
Feeding cattle can be hard and it’s a part of science and art.
Not everyone can artistically feed their beef cattle.
Only knowing the method of feeding cattle is not enough. We need the best cattle feed mix to complete our method of feeding cattle.
In this article,
We will be discussing the buying guide of the best cattle feed mix for your cattle.
Grain supplement
If you want to make cattle fat and be healthy then having grain supplements into your cattle feed mix is very important.
Many farmers make sure they are reducing costs by feeding grain supplements to their cattle.
But,
Cattle feed mix includes all the grain supplements
So that,
Your cattle have healthy fat in their body. Grain supplements are best for winter so that your cattle’s body is harmful.
You will get every nutrient your cattle need in their body. Make sure your cattle feed mix includes hay in the packet so that your cattle can be healthy.
Your cattle feed mix needs to include the right amount of hay your cattle needs.
Type of Feeds
Different types of feeds have been produced and they have their advantages and disadvantages.
Most feeds have included vegetables, grass, or silage in their mix.
The cattle that are expanded in feedlots are usually needed a small amount of hay that
- Has soy.
- Grain.
- And other ingredients to make sure they have energy and strength.
Pasture feed or grass feed cattle are raised on a forage diet.
So,
You need different types of feed mix for small, medium, and larger sizes of cattle.
Make sure you are careful while choosing the cattle feed mix for your cattle because the feed mix differs according to the cattle’s age and size.
Cattle Breed
Another major point while choosing your cattle feed mix is to recognize the breed of your cattle.
Because
Not every cattle feed mix is made for the same need.
Different breeds of cattle need a different type of feed mix for them.
The nutrients that cattle need differ according to their breed, age, and size. Breeding plays a crucial role in planning feeding ratios.
Dairy cattle need higher maintenance necessities than beef cattle. That’s why dairy cattle need a different mix than beef cattle.
British breeds that need lower maintenance are,
- Shorthorn
- Angus
- Hereford
That’s why you need different types of feed mix for your British cattle.
Make sure to research deeply before buying the best feed mix for your cattle according to their
- Breed
- Size
- Age
Cattle Breeds and Terms
Accessing Your Cattle
You have to realize the productivity status of your cattle to make sure the diet plan is appropriate.
Five different classes are generalized for cattle. These five classes are based on
- Meat
- lactation
- Breeding
These factors have to be in your mind while planning an initial diet for your cattle.
You have to realize when your cattle need to gain weight and give them the feed mix according to the retirements.
Every cattle has the specific condition to gain weight and you have to provide the appropriate diet mix for cattle.
For example,
In the case of cows that are lactating, you should consider how long they have been delivering milk.
Also,
You should think about the quantity of milk they are providing, their pregnancy status, and their health status.
By realizing these conditions you have to give them the feed mix that is made for these specific limitations.
Cattle Feed Rations Update
FAQ
Question: Can cows survive on grass alone?
Answer: Most people think cows can survive on grass alone which is misinformation. A cow can survive on grass alone and many cows are living on it by eating only grass.
But if you have a farm and you want your cows to be fat then you need more than grass.
You need a cattle feed mix to meet all the requirements for your cows to be healthy and fat. They will healthily gain weight and produce more milk.
Most people think cows can survive on grass alone which is misinformation. A cow can survive on grass alone and many cows are living on it by eating only grass.
But if you have a farm and you want your cows to be fat then you need more than grass.
You need a cattle feed mix to meet all the requirements for your cows to be healthy and fat. They will healthily gain weight and produce more milk.
Question: How many cows can you put on an Acre?
Answer: On average pasture, make sure you’re putting between 0.5 to 1.1 cows per acre. If you’re doing rotational grazing you might need more cows per acre up to 30%. Traditional grazing does not require more cows per acre but rotational grazing does.
Conclusion
Best cattle feed mix has always been the best option for your cattle to be healthy and fat.
Your big horses and cows need health maintenance that can be done with a cattle feed mix.
Keep in mind that you need a lot of research to make sure you’re providing the accurate cattle feed mix to your cows.
We hope you have gathered the knowledge of cattle feed mix from our article. We would love to see if you leave a comment below and make sure to put a feedback.